A slow leak in your toilet tank may not be immediately apparent, but it can lead to significant water waste over time and drive up your water bills.
It may also indicate a more serious underlying issue.
This guide will provide a comprehensive overview of how to identify and fix the source of a slow leak in your toilet tank.
We will cover common causes, necessary tools, and step-by-step repair instructions.
Following this guide, you will not only be able to fix your slow-leaking toilet tank.
And also can save money on your water bills and prevent potential problems.
Why Leaky Toilet Tanks Happen
Leaking toilet tanks can be a frustrating and costly problem, but understanding the causes of these leaks can help you prevent them from happening in the first place.
Some common causes of leaks in toilet tanks include worn-out parts, improper installation, and hard water buildup.
Common Causes of Leaks
- Worn-out parts, such as the water supply line, tank-to-bowl gasket, and flapper valve, can deteriorate over time, leading to leaks.
- Improper toilet tank installation can also lead to leaks, as it can cause stress on the joints and connections, leading to cracks and leaks.
- Hard water buildup can also cause leaks in the toilet tank, as minerals in the water can build up on the parts and cause them to wear out faster.
The Importance of Regular Inspection and Maintenance
Regular toilet tank inspection and maintenance can help you catch and fix leaks before they become significant problems.
This includes inspecting the water supply line, tank-to-bowl gasket, and flapper valve for any wear and tear and promptly replacing worn-out parts.
It is essential to keep an eye on the overall condition of the toilet tank, such as checking for cracks or other damage.
Also, take steps to address any issues as soon as they are noticed.
Inspecting and maintaining your toilet tank can help prevent leaks and save you time and money in the long run.
Tools and Materials Needed
When repairing a leaky toilet tank, having the right tools and materials is essential to ensure a successful repair.
This section will review the tools and materials needed to complete the repairs outlined in this guide.
List of Tools and Materials Required
- Adjustable wrench: This tool is essential for tightening and loosening nuts and bolts on the water supply line, tank-to-bowl assembly, and flapper valve.
- Sponge: A sponge will be handy for mopping up any residual water in the tank after you turn off the water supply.
- Ball-cock assembly: If you find that the water supply line is leaking, you may need to replace the ball-cock assembly, which is the term used to describe the water-supply valve and float arm inside the toilet tank.
- Tank-to-bowl gasket: If the leak comes from the tank and bowl connection, you must replace the gasket that seals this connection.
- Bolt assemblies: If the tank is loose on the bowl, you’ll need to replace the bolts and washers that hold the tank in place.
With the right tools and materials, you’ll be well-equipped to tackle any repairs that need to be made to your leaky toilet tank.
Where to Purchase the Materials
When dealing with a leaky toilet tank, identifying the source of the leak and having the correct tools and materials on hand is crucial for a successful repair.
However, finding the right parts and equipment can sometimes be a challenge.
This section will discuss the best places to acquire the necessary items for completing repairs outlined in this guide.
- Home Improvement Stores: Home improvement chains have many toilet repair parts, including ball-cock assemblies, tank-to-bowl gaskets, and bolt assemblies. They also have tools like adjustable wrenches and sponges readily available.
- Online Retailers: Online retailers also have a wide selection of toilet repair parts and tools, often at competitive prices with fast shipping options.
- Hardware Stores: Local hardware stores may also have a selection of toilet repair parts and tools and can even special order parts if they are not in stock.
It’s important to note that when purchasing replacement parts.
Ensuring that the parts are compatible with your specific toilet model is vital.
You can take the model number of your toilet or the old part to the store or use it when ordering online.
Obtaining the correct parts and tools and finding the best prices will enable you to repair your leaky toilet tank quickly and have it back in working order.
Safety Precautions
When working on a toilet, it’s essential to take the necessary precautions to ensure your safety and the longevity of the toilet.
This section will review some safety tips when working on your leaky toilet tank.
Turning off the Water Supply Before Starting Repairs
- Before starting any repairs on the toilet tank, it’s crucial to turn off the water supply to the toilet to prevent any accidental flooding. The shutoff valve is typically located beneath the tank near the floor.
- Turning off the water supply before starting any repairs can prevent water from escaping into the bowl and causing further damage.
Prevent Porcelain Tank Cracks by Not Overtightening Nuts and Bolts
- The porcelain tank is susceptible to cracking from the pressure of over-tightened nuts and bolts. Therefore, it’s essential to be careful when tightening nuts and bolts and to only turn the nuts a quarter turn or so past hand tightening.
- Additionally, avoiding excessive force is important when tightening nuts and bolts, as this can cause the porcelain tank to crack.
- Additionally, the nut and fitting are likely made of nylon, which can strip when overtightened; it’s essential to be careful and follow the manufacturer’s instructions.
Water Supply Line Repair
Water supply line leaks are a common problem in toilet tanks, but they can be easily repaired with the proper knowledge and tools.
This section will cover the steps for inspecting, testing and repairing leaks in the water supply line.
Inspection and Testing for Leaks
- The first step in repairing a water supply line leak is to inspect where it meets the tank along the line.
- To test leaks, you can use your fingers to feel for drips or run your hand along the line to see if water is escaping.
Tightening the Jamb Nut
- If a loose jamb nut causes the leak, the next step is to use an adjustable wrench to tighten the nut.
- It’s essential to proceed when tightening the nut, as the nut and fitting are likely made of nylon and can strip when over-tightened.
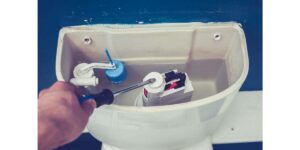
Replacing the Ball-Cock Assembly
- If tightening the jamb nut does not stop the leak, the next step is to replace the ball-cock assembly.
- A ball-cock assembly is a term used to describe the water-supply valve and float arm inside the toilet tank.
Step-by-Step Instructions for the Repair
- To repair the water supply line, you’ll need to turn off the water supply at the shutoff valve near the tank near the floor. Flush the toilet and allow the water to escape from the tank. Mop up any residual water with a sponge.
- Next, loosen the jamb nut with an adjustable wrench, pull out the old ball-cock, and put in the replacement part. Tighten the new jamb nut, but only over-tighten the fitting.
Tank-to-Bowl Assembly Repair
Loose hold-down bolts or worn-out gaskets can cause leaks in the tank-to-bowl assembly.
This section will cover the steps for inspecting, tightening, and replacing the gasket in the tank-to-bowl assembly.
Checking and Tightening Hold-Down Bolts
- The first step in repairing a leak in the tank-to-bowl assembly is to check the bolts that hold the tank to the toilet bowl.
- Determine whether the nuts holding the tank are loose and tighten them if necessary.
Replacing the Gasket
- If the leak continues after tightening the hold-down bolts, replacing the gasket that seals the connection between the tank and the bowl is next.
- Gaskets lose elasticity over time and can crack if they harden sufficiently.
Step-by-Step Instructions for the Repair
- To repair the tank-to-bowl assembly, you’ll need to turn off the water supply at the shutoff valve near the tank near the floor. Flush the toilet and allow the water to escape from the tank. Mop up any residual water with a sponge.
- Next, loosen the nuts that secure the hold-down bolts and the jamb nut that secures the water supply line to the tank.
- Pull the tank free of the bowl. Remove the old gasket, and replace it with the correct part for your toilet.
- Reattach the tank, insert the hold-down bolts and washers, and tighten the nuts. Do not overtighten, as porcelain cracks readily under the strain of overtightened nuts.
- Turn the water back on and allow the tank to fill.
Leaking Flapper Repair
A leaking flapper is another common problem in toilet tanks, but it can be repaired with the proper knowledge and tools.
This section will cover the steps for testing, replacing, and fixing the flapper valve.
Testing the Flapper Valve
- The first step in repairing a leaking flapper is to test whether the flapper valve no longer sets correctly.
- The flapper is the device at the bottom of the tank that prevents water from flowing into the bowl until someone flushes the toilet.
- To test for a leak, squeeze a few drops of food coloring into the bowl and wait several minutes. The flapper leaks if the color shows up in the bowl without flushing.
Replacing the Flapper
- If the flapper is not seated correctly, the next step is to replace it.
- It is likely hardened if it does not feel soft and pliable and needs replacing.
Step-by-Step Instructions for the Repair
- To repair the leaking flapper, you’ll need to turn off the water supply at the shutoff valve near the tank near the floor. Flush the toilet and allow the water to escape from the tank. Mop up any residual water with a sponge.
- Next, examine the flapper; if it needs replacing, snap off the old flapper and remove the chain that leads to the flush handle.
- Replace it with a new flapper and reattach the chain.
- Turn the water back on and allow the tank to fill.
Tips for Maintaining a Leak-Free Toilet Tank
A leaky toilet tank can be a nuisance, leading to water damage and higher water bills.
Regular maintenance can prevent leaks and keep your toilet in good working condition for years.
Regular Inspection and Maintenance of the Tank and its Parts
- Regularly inspecting the tank and its parts can help you catch potential leaks before they become a significant problem.
- Check for leaks in the water supply line, tank-to-bowl assembly, and flapper valve.
- Regularly inspecting the tank and its parts can also help you identify worn-out parts that need replacing before they cause a leak.
Replacing Worn-out Parts Promptly
- Replacing worn-out parts is crucial in preventing leaks and keeping your toilet in good working condition.
- Common parts that need replacing include the gasket, flapper, and ball-cock assembly.
Avoiding Flushing Non-Biodegradable Materials Down the Toilet
- Flushing non-biodegradable materials down the toilet, such as wipes, sanitary products, and paper towels, can cause blockages and damage to the tank and its parts.
- Avoid flushing these materials down the toilet and dispose of them properly to prevent damage to your toilet.
Regular inspection and maintenance of your toilet can help you identify potential problems early and prevent leaks from occurring.
When to Call a Professional
A handy homeowner can repair many toilet leaks, but there are certain situations where it is best to call a professional plumber.
Situations Where it is Best to Call a Professional Plumber
- If you are unable to locate the source of the leak
- If you are unsure about the repair process or lack the necessary tools and equipment
- If the leak is severe and causing damage to your home
- If you suspect an underlying issue with your plumbing needs addressing.
The Benefits of Professional Repairs
- Professional plumbers have the necessary knowledge, skills, and tools to quickly and effectively diagnose and repair leaks.
- They can also identify and address underlying issues causing the leak, such as a broken pipe or clogged drain.
- Professional repairs can also save you time and money and prevent further damage to your home.
It can be attempting to try and fix a leaky toilet tank on your own. But there are certain situations where it is best to call a professional plumber.
A professional plumber can quickly and effectively diagnose and repair leaks and identify and address underlying issues causing the leak.
Conclusion
A leaky toilet tank can be a nuisance, resulting in water damage and higher water bills.
Regular inspections and maintenance can prevent leaks and ensure your toilet stays in good working condition for years.
Understanding the leak’s location is crucial in determining the appropriate repair method.
A homeowner can do some repairs with the proper knowledge and tools.
But certain situations may require the expertise of a professional plumber.