Can you remove a toilet tank’s locknut? Sure, if you follow the proper steps. A toilet tanks locknut is more formally known as an anchor nut. This nut holds the filling valve of your toilet in place so that the toilet and the tank fill the water properly.
Locknuts are an essential part of each toilet, even though they may be a bit confusing. Without the proper tools and knowledge, you could make a mess of things!
Removing a plastic Locknut from toilet tanks seems like an easy job, but it can be tricky. If you do not use the right tools or follow the right steps, you could end up damaging your toilet.
We will describe some simple steps to remove a plastic locknut from a toilet tank so that you can do it by yourself by next time.
If you are reading this article, then that means you want to save some money by doing it yourself! Good for you!
But before you start diving into your project, there are some things you need to know about how to remove a plastic locknut from a toilet tank.
Here is What You Will Need to Remove the Locknut from Your Toilet Tank
- Rag
- Bucket
- Hex wrench or adjustable wrench (depending on what type of nut you have)
- Pliers
- Adjustable wrench (again, depending on the type of nut)
- Hose (if you need to siphon water)
Note: The bucket and rags are useful every time you work with water. You run the risk of creating a wet mess when you remove a toilet tank’s locknut, but you should be able to remove it without too much trouble if you take your time and follow the appropriate steps for your toilet.
How To Remove a Toilet Tank Lock Nut?
The first thing you have to do is make sure; that your toilet tank is drained of water. You’ll want to do this; so that when you remove the locknut, no water spills onto the floor or gets on your clothing.
It is just better to be safe than sorry. Once that is done, it is time to get cracking on removing the locknut from a toilet tank!
Step 1. Put the Bucket Under the Water Supply Line
Position the bucket under the water supply line of your toilet tank so that the water drains into it. This will prevent water from spilling out of the tank or onto your floor or carpet.
Step 2: Turn Off the Water Supply Line
It is important to cut off the water supply to the toilet tank. To do it turn the handle on the fill valve, clockwise as long as it stops.
This prevents you from having to deal with a messy situation that could arise. You may need an adjustable wrench for this step.
If you have an older toilet, you may want to shut off the water valve under your sink as well. This will stop any running water and prevent it from spraying out of the tank during your removal process.
If you can not find the shut-off valve in your bathroom; then you just shut off the main water supply to eliminate any chance of overflow.
You should be able to find this valve in your basement or garage or outside your house near where the water meter is.
Remove the Cover of The Toilet Tank
Grab the toilet tank cover and pull it back to reveal everything inside the toilet tank. If you haven’t cleaned your toilet tank in a while, the lid may be stiffer than usual.
You may need to give it a good wash to get the grime and stains off before putting it back on once you’re finished.
Remove Water From the Tank
To drain the water from your toilet bowl, flush the toilet and wait for all of the water to flow into the bowl. If necessary, repeat this process until you see no more water draining into the bowl.
If all the water cannot be removed from the tank, then try using a sponge, rag, or towel to absorb the remaining water; and then pour the water into an empty bucket for disposal.
Disconnect the Plastic Coupling and Remove it From the Inside of the Tank
First, remove the coupling inside the tank that is connected to an overflow tube inside the tank.
This is easy to do because it’s not connected very tightly.
When you have unscrewed this piece, use the drain stopper to remove any water remaining in your tank.
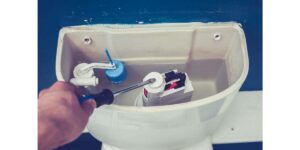
Remove the Plastic Nut by Unscrewing it
To remove the toilet tank plastic lock nut, all you need is an adjustable wrench or a pair of locking pliers. Hold the lock nut and turn it clockwise as long as it detaches from the toilet tank.
When removing a plastic nut from your toilet tank, be careful: Plastic can break if you apply too much force with the adjustable wrench.
How to Manage a Stuck Lock Nut?
In some cases, a locknut can become stuck. When a lock nut gets stuck, several methods can be used to remove it.
Method 1. Loosen the Screw by Applying Heat; Then Remove it
If your locknut is plastic, you can ease its removal by using a hairdryer to heat it. Hold pliers near the nut while you apply gentle heat with the hairdryer. Once the nut is warm, it should become loose enough to remove with pliers.
Method 2. Use Calcium Dissolver
If the inside of your toilet tank has accumulated calcium deposits, it can be hard to remove the plastic nut, even with a wrench. However, if you have a calcium dissolver, this will remove the calcium and make it easier to remove the plastic nut.
After dissolving the calcium buildup with a chemical, you can proceed with repairing. To determine when the chemical is ready, watch for the formation of a white powder on the surface of the calcium deposits that can be easily wiped away.
Why is Removing Plastic Nuts From Toilet Tank?
have you ever wondered why it is required to remove plastic nuts from the toilet tank?
There are two main reasons why it’s important to remove plastic nuts from the toilet tank.
First, they can cause leaks around the base of your toilet if they’re not properly secured.
Second, these little pieces of plastic may clog up your pipes with sediment or other debris, which can lead to serious damage if not taken care of right away.
Here are some more reasons to remove the plastic nuts from the toilet tank
- It can leak when not tightened all the way
- It can get stuck and not loosen easily, even with a wrench
- It is hard to tighten a plastic nut underwater
- It could break off, causing water to leak everywhere, or worse, making the toilet unusable until the tank is replaced.
- To make adjusting the water flow.
Related Questions
Do Toilet Fill Valves go Bad?
Toilet fill valves are an important part of the toilet’s operation. If you experience a non-stop running toilet, it could be because the fill valve is broken.
This can lead to an increase in water bills and is not to be ignored. Fortunately, the problem can be fixed by replacing the fill valve or toilet flapper valve. There are many different types of replacement parts available on the market, so take your time and find one that fits your needs.
What is a Locknut? How do I Fix a Loose One?
In your toilet tank, the valve controls the water flow. There are two valves in the tank: the fill valve; and the flush valve. These valves get a lot of use and over time they can loosen.
The plastic lock nut helps keep them in place; so they don’t come loose or leak. These nuts are located at the bottom of your toilet tank, below the water level.
If you notice that your toilet is leaking or running, it may be caused by a loose plastic locknut (or a broken seal). To replace your locknut, you must drain the water from both the bowl and tank (if you’re not sure how to do this, please consult with a professional).
Then, simply access the plastic locknut using an adjustable wrench. If you are replacing a locknut on a newer model check the instruction manual to see if there are any special instructions or tools required.
Once you’ve removed and replaced the old plastic locknut with a new one, turn on the water supply to refill the tank and flush your toilet.
How can I loosen a plastic locking nut?
If you are having trouble getting a locking nut off, following these steps will help loosen it:
1. Use hot water to warm up the locking nut. You can also use a hairdryer to heat it up, but be sure to wear hand gloves so you don’t get burned.
Heat it for about five minutes, this will make the plastic more flexible and easier to remove! If you are using hot water, place the locknut on a wet towel so it can absorb the heat quickly.
2. Once it’s warmed up, start tapping lightly on the locknut with pliers. After about 15 seconds, your locknut should begin to loosen!