Replace a Toilet with Cast Iron Pipe – a task that sounds simple enough but can quickly become a daunting challenge for anyone who hasn’t done it before.
Whether you’re dealing with an old, leaky toilet or want to upgrade to a newer model, this guide will walk you through the steps you need to take to get the job done right.
Don’t let the thought of plumbing repairs intimidate you – with a little know-how and some basic tools; you’ll be able to replace a toilet on the cast iron pipe.
So roll up your sleeves, grab a wrench, and let’s get started!
- Gather Your Tools and Materials
- Step-by-Step Guide
- Step 1: Turn off the Water Supply
- Step 2: Disconnect the Supply Line and Remove the Toilet
- Step 3: Remove the Old Flange
- Step 4: Install the New Flange (Optional)
- Step 5: Install the Wax Ring and Toilet Bolts
- Step 6: Install the New Toilet
- Step 7: Connect the Supply Line and Turn on the Water
- Step 8: Test the Toilet
- Tips and Tricks
- FAQ
- Conclusion
Gather Your Tools and Materials
Before you get started to replace a toilet on the cast iron pipe, you’ll need to gather a few tools and materials. Here’s what you’ll need:
Tools:
- Wrench or pliers
- Screwdriver
- Hacksaw or reciprocating saw
- Putty knife
- Bucket
Materials:
- New toilet
- Wax ring
- Toilet bolts and nuts
- Flexible supply line
- PVC flange (optional)
Step-by-Step Guide
Once your tools and materials are ready, it’s time to start replacing your toilet with a cast iron pipe.
Here are the steps you’ll need to follow:
Step 1: Turn off the Water Supply
Before you begin any plumbing project, turning off the toilet’s water supply is essential.
Locate the shut-off valve behind the toilet and turn it clockwise until it stops.
Then, flush the toilet to drain water in the tank and bowl.
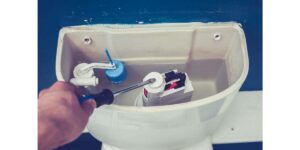
Step 2: Disconnect the Supply Line and Remove the Toilet
Use a wrench or pliers to disconnect the supply line from the bottom of the toilet tank.
Next, use a wrench or pliers to remove the nuts from the bolts at the toilet’s base. If the nuts are rusty or difficult to remove,
you may need a hacksaw or reciprocating saw to cut them off.
Once the nuts are removed, use a putty knife to break the seal between the toilet and the floor.
Then, lift the toilet and place it in a bucket or other container.
Step 3: Remove the Old Flange
The flange is the piece that connects the toilet to the drain pipe. If the old flange is damaged or corroded, remove it before installing the new toilet.
To remove the old flange, use a hacksaw or reciprocating saw to cut it off.
Be careful not to damage the surrounding pipes or fittings.
Step 4: Install the New Flange (Optional)
If the old flange was damaged or corroded, you might need to install a new one.
PVC flanges are popular because they’re easy to install and don’t corrode like metal flanges.
To install the new flange, slide it over the cast iron pipe and secure it with screws.
Be sure to use a flange that matches the size of your drain pipe.
Step 5: Install the Wax Ring and Toilet Bolts
The wax ring seals the connection between the toilet and the drain pipe. To install the wax ring, place it on the flange with the rounded side facing up.
Next, insert the toilet bolts into the flange slots. Be sure to position them correctly to line up with the holes in the toilet base.
Step 6: Install the New Toilet
Carefully lower the new toilet onto the wax ring and align the bolt holes with the toilet bolts.
Once the toilet is in place, press down firmly to compress the wax ring and create a tight seal.
Then, secure the toilet to the flange with nuts and washers. Be careful not to overtighten the nuts, as this can crack the toilet base.
Step 7: Connect the Supply Line and Turn on the Water
Finally, it’s time to connect the supply line to the bottom of the toilet tank. Use a wrench or pliers to tighten the connection until it’s snug.
Once the supply line is connected, turn on the water supply and allow the tank to fill up.
Check for any leaks around the supply line and the toilet base.
Step 8: Test the Toilet
Flush the toilet a few times to ensure that everything is working properly.
Check for any leaks or issues with the water flow. If everything looks good, you’re done!
Tips and Tricks
Replacing a toilet on a cast iron pipe can be challenging, but you can use a few tips and tricks to make the process go smoothly.
- Use a reciprocating saw or hacksaw to cut through rusty nuts or bolts.
- Consider installing a PVC flange if your old one is damaged or corroded.
- Be sure to choose a wax ring that matches the size of your toilet and flange.
- When aligning the toilet bolts, use a level to ensure the toilet sits evenly on the floor.
- Don’t overtighten the nuts that secure the toilet to the flange, which can cause the toilet base to crack.
- Test the toilet thoroughly before putting any weight on it or using it regularly.
FAQ
Yes, a PVC toilet flange can be installed on a cast iron pipe.
You can fix a cast iron toilet drain pipe using a rubber or PVC coupler.
Using a rubber or PVC coupler to transition from cast iron pipe to PVC.
The cost of replacing a cast iron toilet flange can vary, but it typically ranges from $145 to $300.
The cost of replacing a cast iron waste pipe depends on the length and complexity of the job, but it can range from $225 to $1,169 or more.
Conclusion
Replacing a toilet on a cast iron pipe is challenging, but it can be done with the right tools and materials.
Following our step-by-step guide and tips and tricks, you can successfully replace your toilet and ensure it works properly for years.
Remember to take your time, be patient, and don’t hesitate to ask for help if you need it.